If your pain is dull, only shows up in part of the range, and eases once you're warmed up, you can usually keep pressing with a few smart adjustments. If it's sharp, catches at a specific point, or wakes you up at night, stop pressing overhead and get it assessed. Either way, three moves help immediately: cut your range of motion, drop the load, and switch to a neutral grip or landmine angle while you run the mobility checks below.
TL;DR:
- Reducing range of motion, switching to neutral grips, and using landmine variations can address most shoulder pain during overhead pressing without further injury.
- Pain localized to the painful arc between 60 and 120 degrees suggests impingement or rotator cuff irritation that responds well to load management.
- Key mobility checks, like thoracic extension and shoulder external rotation tests, identify restrictions critical for safe pressing and rehab progress.
- Early rehab should stay below 90 degrees of elevation with specific rotator cuff strengthening, progressing gradually over 8 to 12 weeks to full overhead pressing.
- Severe symptoms such as swelling, night pain, or sudden strength loss require immediate professional assessment rather than self-managed modifications.
Table of Contents
- Should You Keep Pressing Through Shoulder Pain Overhead?
- Common Causes of Shoulder Pain During the Overhead Press
- What Mobility Tests Should You Run Before You Press?
- Rehab Exercises to Rebuild Shoulder Capacity
- Safer Overhead Press Variations While You Rehab
- How Do You Progress Back to Full Overhead Pressing?
- Red Flags That Mean You Need a Professional Assessment
- Pressing With Arthritis or Shoulder Instability
- Ironatforty's Perspective: Keep Pressing Where Safe, Train for Decades
- Tools to Help You Plan Your Return to Pressing
- Key Studies and Rehab Resources
- Sources
- FAQ
Should You Keep Pressing Through Shoulder Pain Overhead?
Start with a quick gut check on what the pain actually feels like. Dull, achy, or "tight" sensations that show up only in the bottom or top few inches of the lift usually mean irritated tissue that responds well to modification. Sharp pain, a catching or locking sensation, or pain that shows up the same way every single rep points toward something that needs a closer look before you load it again.
The painful arc is the single most useful test you have in the gym. If pain appears specifically between roughly 60 and 120 degrees of shoulder elevation and disappears above or below that window, you're likely dealing with subacromial impingement or rotator cuff irritation rather than a joint problem. That's actually good news. It responds to load management, not necessarily a training break.
Three modifications solve most cases on the spot:
- Reduce your range of motion so you never enter the painful arc.
- Switch to a neutral grip (dumbbells, landmine) to reduce rotational stress on the joint.
- Try a half-kneeling or landmine variation, which changes the angle of the humerus relative to the shoulder blade.
Stop entirely and get evaluated if you notice swelling around the joint, pain that wakes you up at night, or a sudden loss of strength you can't push through. Those aren't "work around it" signals.
Pro Tip: Test the painful arc with an empty barbell first. If the arc disappears with lighter load, you're dealing with a load tolerance issue, not a structural one, and you can likely keep training with adjustments.
Common Causes of Shoulder Pain During the Overhead Press
Most overhead press pain in lifters over 40 traces back to one of five mechanical issues, and they often stack on top of each other.
Rotator cuff tendinopathy and subacromial impingement top the list. The cuff tendons, especially the supraspinatus, get compressed against the acromion as you raise your arm, which produces that classic painful arc. Scapular dyskinesis is next: if your shoulder blade doesn't rotate upward properly as your arm rises, the humeral head crowds the subacromial space instead of gliding freely underneath it.
AC joint irritation shows up specifically at lockout, right at the top of the press, where the collarbone meets the shoulder blade. It's a different pain pattern than impingement, usually sharper and more localized to the top of the shoulder.
Less obvious but just as common: limited thoracic extension. If your upper back can't extend, your lumbar spine and scapula compensate, which changes the mechanics of the entire lift. Rehab guidance from the British Journal of Sports Medicine specifically flags the kinetic chain and thoracic mobility as factors in overhead shoulder pain, not just the shoulder itself. Finally, a sudden jump in pressing volume or load, adding heavy overhead work after months away, overloads tissue that hasn't adapted yet.
What Mobility Tests Should You Run Before You Press?
Run these four checks before your next pressing session. Each takes under a minute.
- Thoracic extension test. Stand against a wall with your head, upper back, and glutes touching it, arms overhead holding a broomstick. If you can't keep both wrist and lower back flat against the wall, thoracic stiffness is likely feeding your shoulder pain.
- Overhead reach test. Raise both arms straight overhead without arching your low back. Losing symmetry or range on one side signals a mobility restriction that pressing will aggravate.
- 90/90 external rotation test. With your arm out to the side at 90 degrees and elbow bent 90 degrees, rotate your forearm up. Pain or a noticeable strength deficit here points to cuff involvement.
- Scapular shrug/upward rotation test. Raise your arm overhead and watch your shoulder blade in a mirror. It should rotate upward smoothly; if it hikes or shrugs early, scapular control is the missing piece.
If you fail the thoracic test, work on that mobility before adding pressing volume. If you fail the 90/90 test with pain, move straight to the cuff-focused rehab work below instead of pressing heavy.
Rehab Exercises to Rebuild Shoulder Capacity
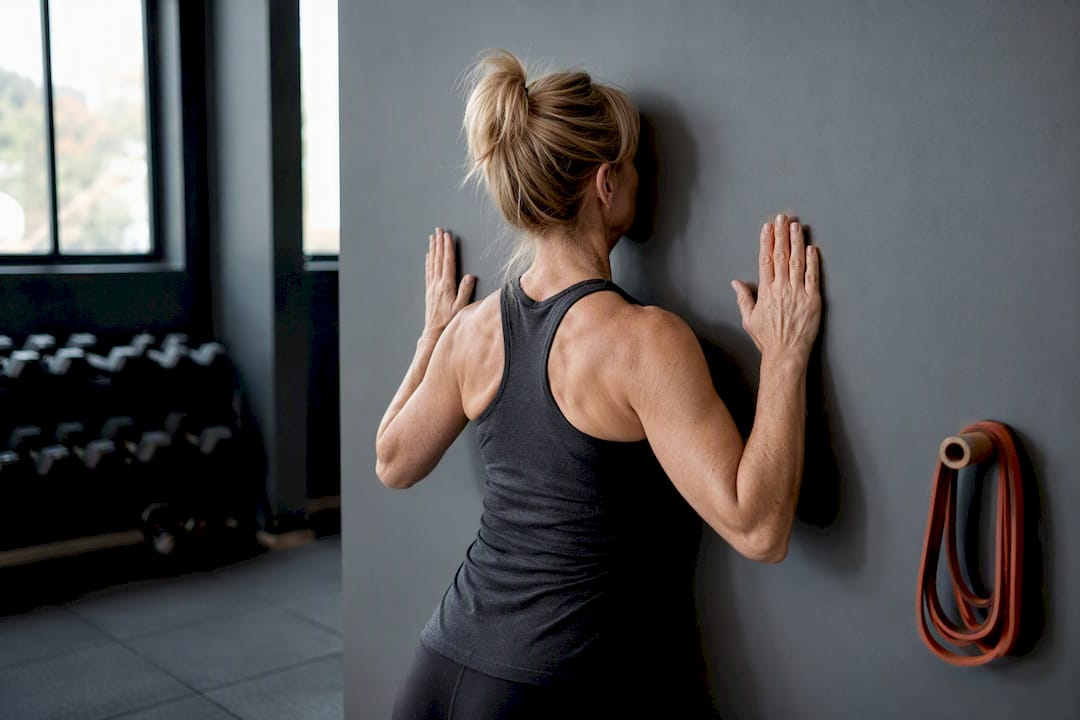
Early rehab should stay below 90 degrees of elevation. The BJSM guidance on shoulder rehab is specific on this point: single-plane, open-chain exercises performed under 90 degrees reduce symptom provocation while you rebuild capacity. That means wall slides, banded rows, and band pull-aparts before anything overhead.
From there, progress your rotator cuff work through three phases: isometric holds first, then eccentric loading, then concentric strength work. A 2025 network meta-analysis on rotator cuff-related shoulder pain ranked concentric strengthening training highest for improving both pain and function, ahead of eccentric-only or general exercise protocols. That's worth knowing if you've been told eccentrics are the gold standard. They're a solid starting point, but concentric work appears to carry more of the load for long-term improvement.
A practical weekly setup:
- 90/90 external rotation eccentrics, 2 to 3 sets of 8 to 12 reps.
- Prone PVC pipe lift-offs for scapular control, 2 sets of 10.
- Face pulls, 3 sets of 12 to 15, focused on control over load.
- Low-range dumbbell presses staying below the painful arc, building reps before adding weight.
Run this 2 to 3 times per week. The GRASP trial found that progressive supervised exercise improved patients' overall sense of recovery even when strict pain-score differences versus general advice were modest over 12 months, so expect steady, unglamorous progress rather than a dramatic turnaround in week two.
Pro Tip: Posterior capsule stretching helps some overhead lifters with genuine tightness, but it's assessment-dependent. Stretching a shoulder that doesn't need it can provoke anterior pain instead of fixing anything.
Safer Overhead Press Variations While You Rehab
You don't have to abandon pressing to let your shoulder heal. A few variations change the joint angle enough to keep training productive.
- Landmine press (half-kneeling or standing): the diagonal bar path reduces subacromial compression compared to a straight vertical path.
- Neutral-grip dumbbell press: keeping your palms facing each other cuts rotational stress and eases AC joint loading at lockout.
- Incline close-grip press or floor press: builds pressing strength without ever reaching full overhead lockout.
- Push press: useful if pain shows up specifically in the strict-press grind phase, since leg drive reduces time under tension through the painful arc.
- Box or deadstop press, and band-supported pin presses: these control the eccentric portion and let you start from a dead stop above your painful range.
Match the variation to your symptom. Pain at lockout points you toward landmine or incline pressing. Pain through the mid-range points you toward neutral-grip dumbbells with a reduced range of motion.
How Do You Progress Back to Full Overhead Pressing?
Build back in this order: pain-free range first, then reps, then load, then full range. Rushing load before range is the most common setback.
- Weeks 1 to 3: rehab exercises plus pressing variations that stay pain-free, 2 to 3 shoulder sessions a week.
- Weeks 4 to 6: add reps within the same pain-free range before adding any weight.
- Weeks 6 to 9: increase load in small increments, still avoiding the painful arc if one exists.
- Weeks 9 to 12: reintroduce full range gradually, starting with landmine, moving to neutral-grip dumbbell, then barbell.
Structure each session as activation, then your main pressing lift or alternative, then targeted cuff work, then mobility. Pair every pressing session with at least equal pulling volume, expert rehab guidance generally recommends a 1:1 or even 2:1 pull-to-press ratio to keep the shoulder balanced. If pain returns at any stage, regress to the previous week's range and load rather than pushing through.
Red Flags That Mean You Need a Professional Assessment
Sharp, catching pain, sudden strength loss, swelling, or pain that progressively worsens at night are not "modify and continue" situations. Get evaluated.
Give conservative rehab a real window, typically several weeks of consistent work, before judging it a failure. If you see zero improvement after a genuine effort, escalate to a physical therapist or sports medicine physician. Early imaging rarely changes initial treatment for most overhead pressing pain; clinicians usually prioritize a hands-on movement assessment first, reserving imaging for cases that aren't responding or that show clear red-flag signs. If you're on medication for pain or inflammation, talk to your doctor about how it fits your training plan rather than adjusting doses on your own.
Pressing With Arthritis or Shoulder Instability
Rotator cuff irritation isn't the only reason overhead pressing hurts past 40. Two other patterns show up often enough to deserve their own approach.
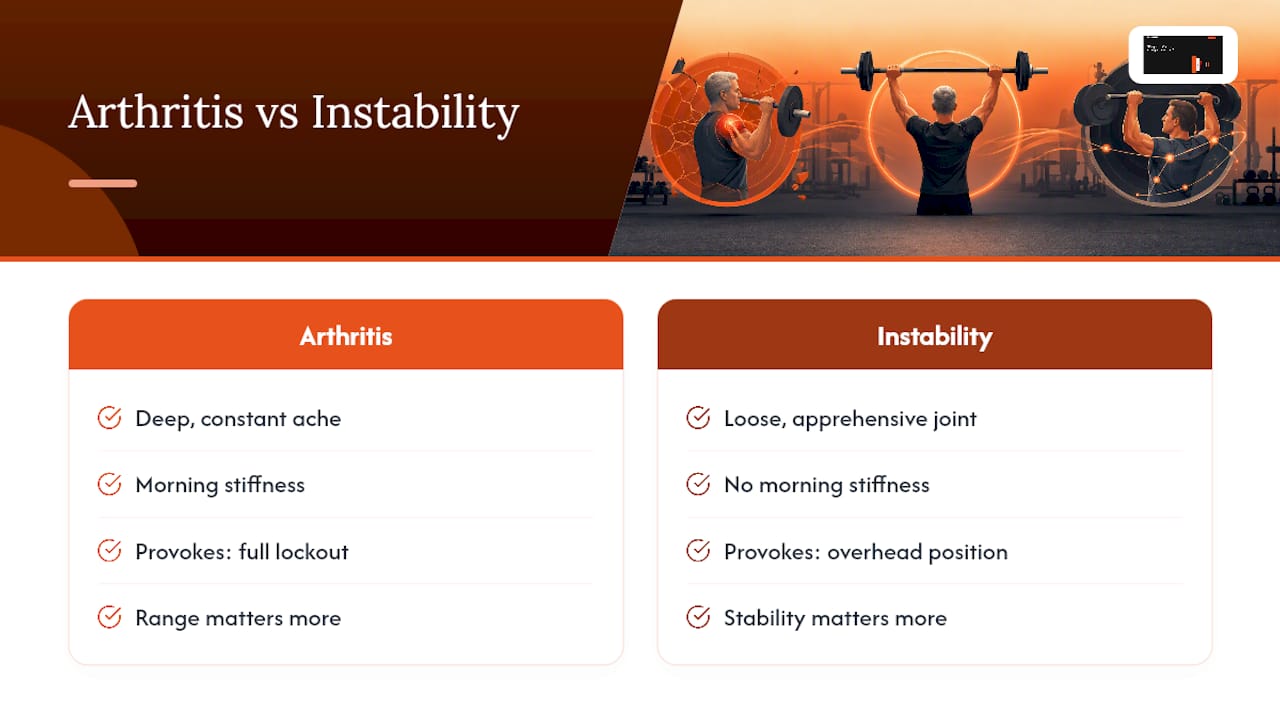
Glenohumeral or AC joint arthritis tends to produce a deeper, more constant ache that doesn't follow the classic painful arc pattern, and it often comes with stiffness that's worse first thing in the morning. Full overhead lockout is usually the most provocative position, since that's where joint surfaces compress hardest. Landmine pressing and partial-range dumbbell work, stopping short of full lockout, let arthritic lifters keep training pressing strength without grinding through the most irritated position. Load tends to matter less than range here; moderate weight through a comfortable arc beats light weight forced through a painful one.
Shoulder instability, a joint that feels loose, apprehensive, or like it might shift, needs a different fix entirely. Overhead pressing loads the joint capsule in a position where an unstable shoulder has the least support. Stability work, closed-chain exercises, and scapular control drills should come before any heavy overhead loading resumes. Pressing variations with a fixed bar path (landmine, machine press if available) give more predictable joint positioning than free-weight overhead work while stability improves.
Neither of these patterns should be self-diagnosed from a blog post. If your pain doesn't fit the painful-arc pattern described earlier, or your shoulder feels unstable rather than just sore, that's a specific reason to get a professional assessment rather than working through the general rehab progression above.
Ironatforty's Perspective: Keep Pressing Where Safe, Train for Decades
Blanket bans on overhead pressing do lifters over 40 no favors. Pressing strength and shoulder health protect each other over the long run, and abandoning the movement entirely often costs more capacity than it saves. The evidence supports modification over avoidance: reduce range, adjust the variation, rebuild the cuff, and reintroduce load in that order. Use Ironatforty's joints and training resources to plan the return methodically instead of guessing.
Tools to Help You Plan Your Return to Pressing
Getting back to full overhead pressing isn't just about the shoulder exercises, it's about managing total training load while your tissue recovers, and that means tracking recovery capacity as carefully as you track sets and reps. Ironatforty's Joints hub covers shoulder-specific recovery in more depth than any single article can, and the Training hub has the programming frameworks to structure your progression week by week.
If you're adjusting training volume while rehabbing, your calorie and protein needs shift too, especially if you're cutting overhead volume but adding extra pulling and cuff work elsewhere. The TDEE calculator on Ironatforty's free tools page helps you dial in intake so recovery isn't working against a calorie deficit you didn't account for. Run your numbers there before you build out the 8 to 12 week pressing progression, then check the joints hub for deeper reading on your specific symptom pattern.
Key Studies and Rehab Resources
The GRASP trial tested progressive exercise against best-practice advice at scale. BJSM's rehab guidance sets the below-90-degree starting principle. A 2025 network meta-analysis ranks exercise types by effectiveness. A BMJ Open Sport RCT supports specific over general exercise programs.
Sources
- GRASP trial (individualized progressive exercise vs best-practice advice) — PMC
- British Journal of Sports Medicine article on shoulder rehab principles
- Network meta-analysis on exercise interventions for rotator cuff-related shoulder pain (2025)
- BMJ Open Sport & Exercise Medicine RCT on specific vs general exercise for SIS (2023)
FAQ
Is Overhead Press Bad for Your Rotator Cuff?
Not inherently. Overhead pressing loads the rotator cuff, and that loading is only harmful when it exceeds what the tendon can currently tolerate, whether from poor mechanics, limited thoracic mobility, or a sudden jump in volume. With proper progression, pressing actually builds cuff capacity rather than damaging it.
How Do You Tell Shoulder Impingement From a Rotator Cuff Tear?
Impingement typically produces a painful arc, pain in a specific range that eases above and below it, without major strength loss. A significant tear usually comes with a noticeable, sudden strength deficit, often after a specific incident, and pain that doesn't follow the same predictable arc pattern. A tear needs professional evaluation to confirm.
What Does a Pinched Rotator Cuff Feel Like?
It usually feels like a dull ache or pinch on top of or in front of the shoulder, worst when the arm is between roughly 60 and 120 degrees of elevation, the painful arc. It often eases once the arm goes past that range, whether higher or lower.
What Is the Most Common Injury From Overhead Pressing?
Rotator cuff tendinopathy and subacromial impingement are the most frequently reported issues among lifters pressing overhead, particularly those with limited thoracic mobility or scapular control. AC joint irritation at lockout is the second most common pattern, especially in lifters who press heavy for years without addressing shoulder blade mechanics.